

h1
Our New York City Award-Winning Links-Style Golf Course
Set against the Bronx waterfront, Bally’s Golf Links at Ferry Point delivers an extraordinary championship experience across its 18hole, Jack Nicklaus Signature Design layout. This award-winning links style course showcases windswept dunes, fescue lined fairways, and sweeping views of the Manhattan skyline and surrounding bridges. Every hole blends strategic shot making with dramatic scenery, creating one of the most memorable public golf settings in New York City.
Book a Tee Time

Golf Outings
Whether hosting a large corporate tournament or an intimate gathering among friends, golf outings at Bally’s Golf Links at Ferry Point offer elevated service from start to finish. Groups of any size enjoy million-dollar views, personalized touches like custom signage and contests, and seamless coordination by an experienced team. Exceptional cuisine from The Waterfront NYC, plus the option of professional caddies, completes a memorable, championship-level experience.
A Tour of NYC's Premier Public Links Course
Bally’s Golf Links at Ferry Point invites golfers to navigate 18 masterfully designed holes shaped by Jack Nicklaus and inspired by traditional Scottish links. With multiple teeing options, rolling fescue, and dramatic skyline backdrops, each hole delivers strategy, challenge, and beauty. Begin your journey through one of New York’s most celebrated public golf experiences.
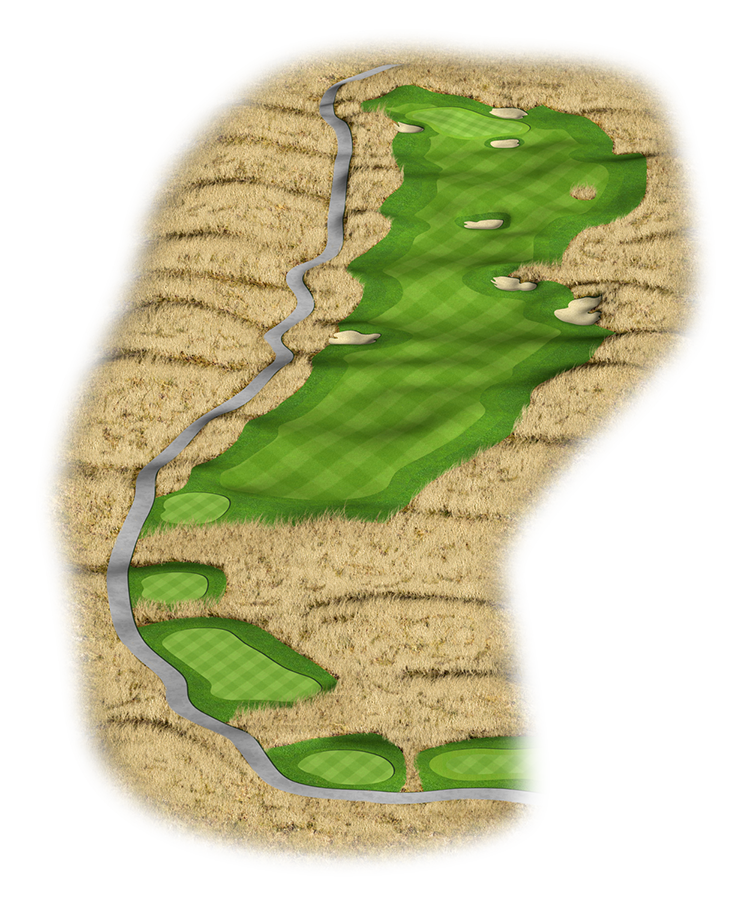
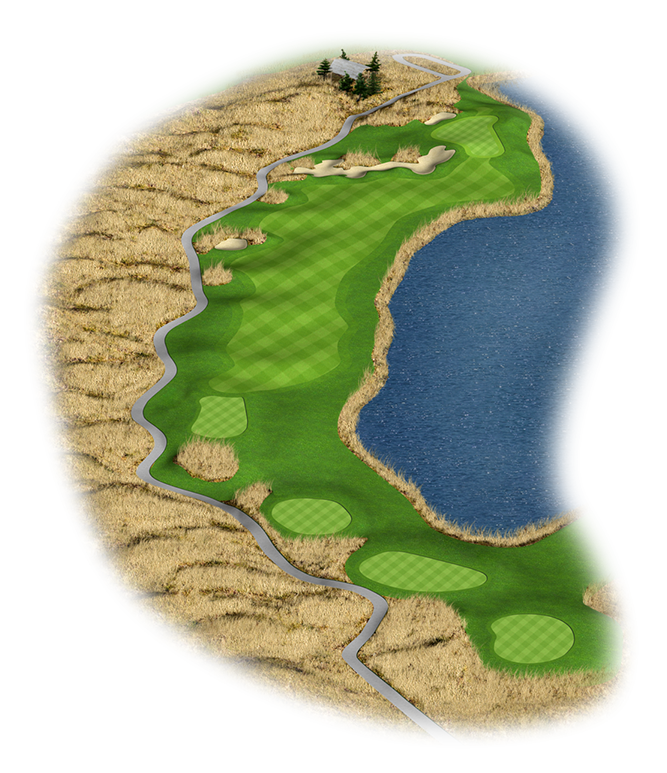
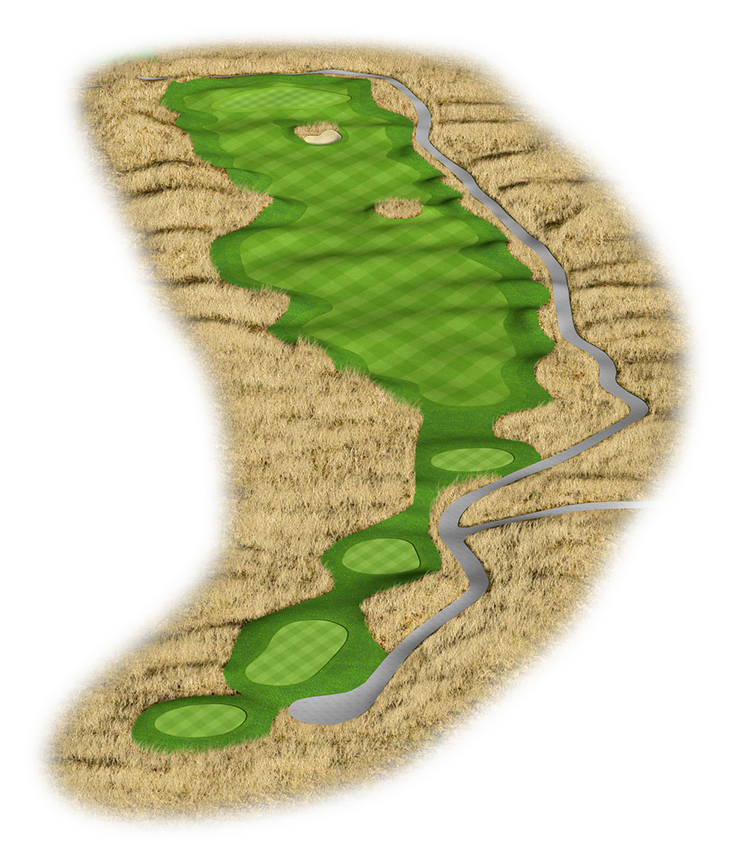
Hole 1
PAR 4 | YARDS: 444 | HANDICAP: 7
The opening hole is a stout par 4 that requires a long, well-positioned drive between three fairway bunkers. The approach shot is slightly uphill to a multi-tiered green nestled among surrounding slopes of fescue. Three greenside bunkers add to the challenge. Par will be a good, solid score on the first hole.
Black: 444
Gold: 409
Blue: 376
White: 363
Green: 319
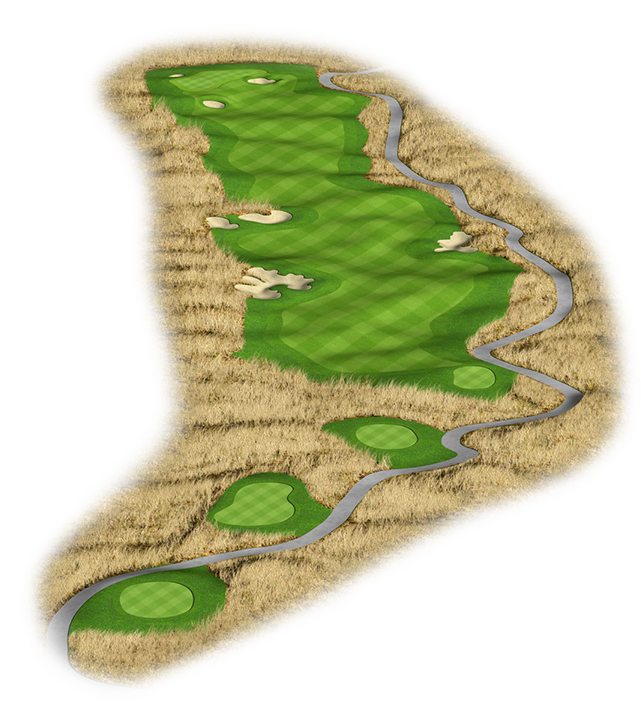
Hole 2
PAR 4/5 | YARDS: 518 | HANDICAP: 5
The second hole is the longest par 4 on the course and starts with a downhill, typically downwind tee shot. The generous fairway is guarded by bunkers on both sides. A drive down the right center will set up the best angle into a long, narrow green surrounded by sand. Pars here at the second hole will be well-earned.
Black: 518
Gold: 466
Blue: 439
White: 416
Green: 374

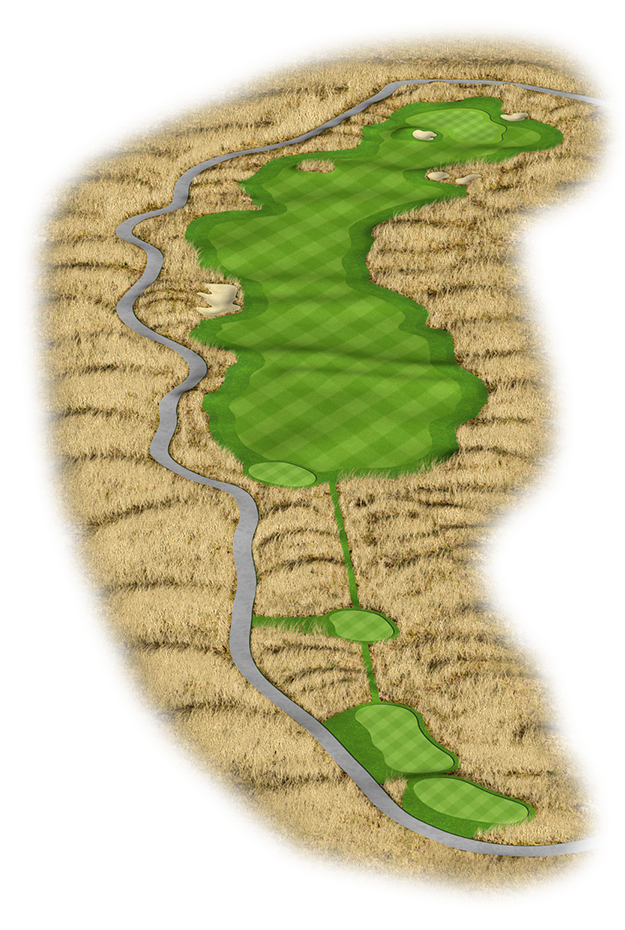
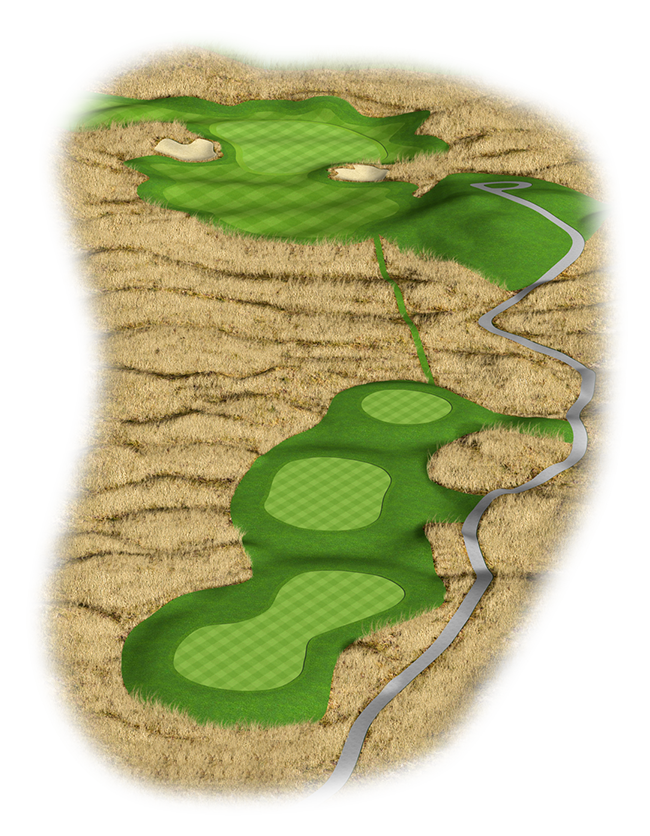
Hole 3
PAR 3 | YARDS: 243 | HANDICAP: 17
This is another very demanding test. Hole number 3 is the longest par 3 on the course and requires a long iron or hybrid approach to a large green. Although this hole usually plays downwind, the putting surface slopes away from the play, adding a degree of difficulty. This hole allows for a running approach shot, but players need to avoid a trio of deep bunkers to find the green.
Black: 243
Gold: 226
Blue: 210
White: 180
Green: 130

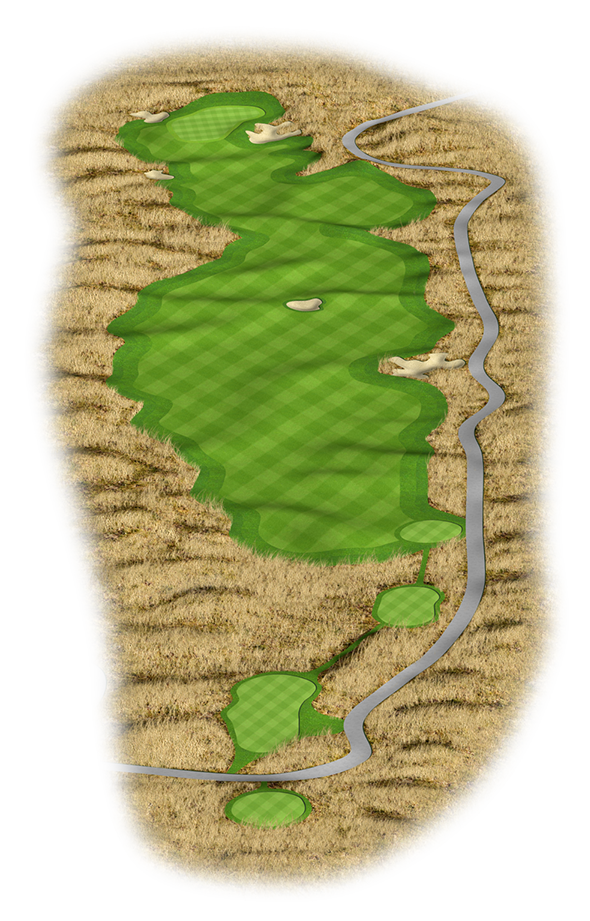
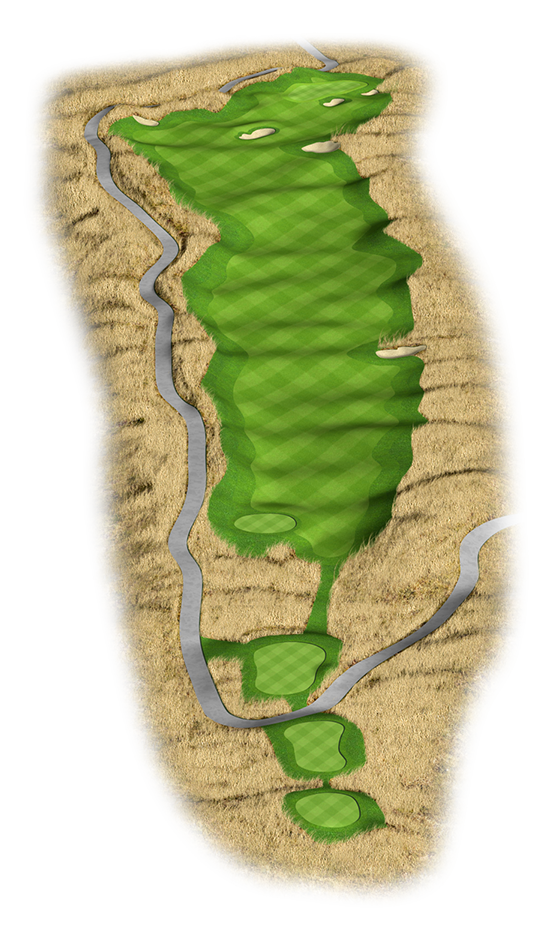
Hole 4
PAR 5 | YARDS: 561 | HANDICAP: 1
The first par 5 on the course gives the player a little slack, provided they avoid the sand and native grasses that line the left side. Although this hole can stretch to 561 yards, it is reachable for the longer hitters, but the green is well-protected. Saving par from locations surrounding this green is a tall order and requires excellent pitching skill. A sound, short game equals a chance for birdie.
Black: 561
Gold: 523
Blue: 490
White: 467
Green: 414
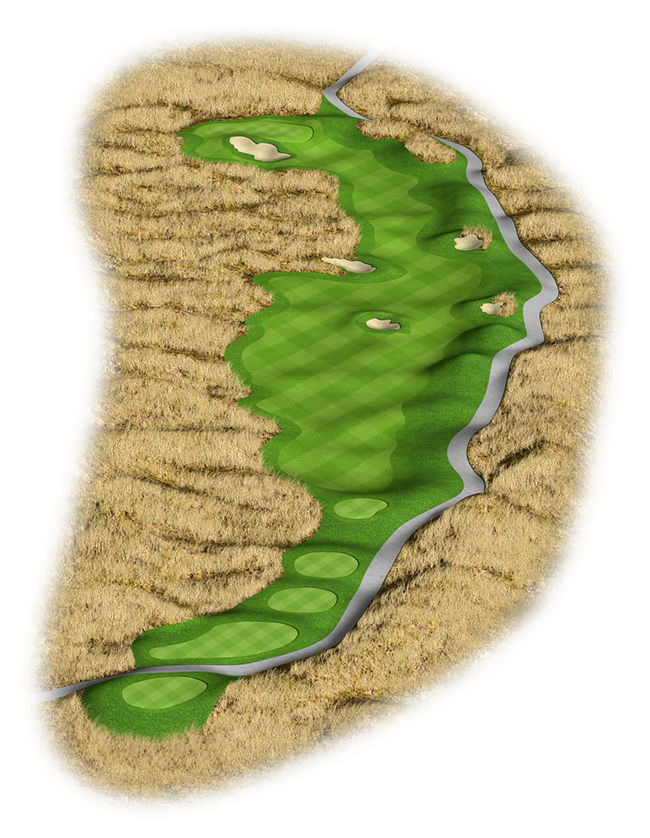
Hole 5
PAR 4 | YARDS: 458 | HANDICAP: 9
Hole number 5 is a solid par 4 with a slight dogleg to the right. A big drive that stays just right of a fairway bunker on the left sets up the best approach angle. Drives to the right lead to a blind approach. From left of center, players have a great view of an angled green behind a deep fronting bunker. A well-placed drive and a solid approach are both required for par or better.
Black: 458
Gold: 436
Blue: 406
White: 374
Green: 290
Hole 6
PAR 4 | YARDS: 468 | HANDICAP: 3
The 6th hole is a long, slightly uphill par 4 that generally plays back into the prevailing wind. The fairway is wide, but don't get careless. Longer hitters need to avoid a devilish center-cut bunker that guards the perfect approach shot position. The green is canted slightly left to right with a bailout hollow on the left side. A deep, yawning bunker protects back right hole locations. Par is a great score here.
Black: 468
Gold: 435
Blue: 400
White: 377
Green: 333
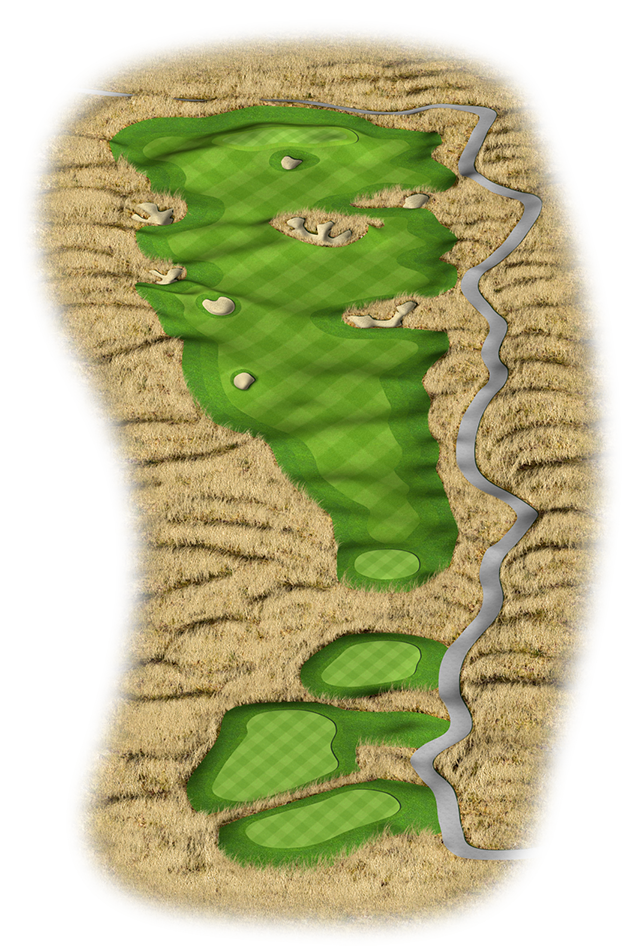
Hole 7
PAR 4 | YARDS: 334 | HANDICAP: 13
This is a scenic and tempting par 4. A safe iron off the tee to a wide fairway is one option. For long hitters, this hole is actually drivable in the right conditions, but any miss to the right will find a large pond. A more aggressive tee shot demands a very precise line toward a well-protected green. This is a classic risk-reward design from Jack Nicklaus, and an excellent opportunity for birdie.
Black: 334
Gold: 298
Blue: 279
White: 269
Green: 219
Hole 8
PAR 3 | YARDS: 214 | HANDICAP: 15
This is a gorgeous par 3 that can measure up to 211 yards. The large, undulating green is nestled into a large dune formation and is protected by bunkers flanking both sides. Distance control from the tee is a must, but a solid mid to long iron will yield a birdie possibility.
Black: 214
Gold: 182
Blue: 170
White: 147
Green: 122
Hole 9
PAR 4 | YARDS: 425 | HANDICAP: 11
This par 4 requires a long, accurate tee shot to avoid a gauntlet of bunkers that create two driving lanes. A tee shot down the left side leaves a slightly shorter but semi-blind approach over a large fronting bunker. Choose the right side, and players have a better angle to attack the flag. Shots missing long and right will roll down into a tightly mown collection area. Without two solid shots, it is a struggle for a par at the 9th hole.
Black: 425
Gold: 401
Blue: 372
White: 372
Green: 352

Hole 10
PAR 4 | YARDS: 460 | HANDICAP: 4
The back nine starts with strength. This long par 4 bends to the left and requires a solid tee shot. A big drive over dunes on the left adds some risk, but could yield a much shorter approach. The elevated green complex features a deep bunker to the right. The best miss is to the left side where a ball will roll into a grass hollow. A deft pitch and putt can turn a missed green into a par saved.
Black: 460
Gold: 434
Blue: 404
White: 380
Green: 335
Hole 11
PAR 4 | YARDS: 352 | HANDICAP: 6
Number 11 is a short and thrilling par 4 that demands players to make a choice from the tee. The fairway features a minefield of bunkers but has generous landing areas if the right club is chosen. A safe tee shot will leave a mid-iron approach, but a big drive that clears the fairway can roll up next to the green. A crisp approach over the deep fronting bunker will offer a good look at birdie.
Black: 352
Gold: 335
Blue: 302
White: 292
Green: 247

Hole 12
PAR 3 | YARDS: 166 | HANDICAP: 18
This is the shortest par 3 on the course but it’s far from a pushover. Navigating the crosswinds into this long, narrow green makes both club selection and pure contact critical. A successful tee shot needs to avoid a deep, right-side bunker and find a green that slopes from back to front. Misses left and right will roll into grass hollows that demand a skilled pitch for recovery. Hole number 12 is a beauty, but it can also be a beast.
Black: 166
Gold: 147
Blue: 139
White: 108
Green: 76
Hole 13
PAR 4 | YARDS: 441 | HANDICAP: 10
This uphill par 4 plays longer than it’s yardage, but it begins with a nice, wide fairway and a stunning view of the Manhattan skyline. Players who successfully find the short grass off the tee are then faced with a mid to long-iron approach. This elevated putting surface is partially obscured by a large dune bunker that stands directly in front of the green. Approach shots can feed down to hole locations left and right, but it takes a great shot to hold the center of the green. Par is an excellent score here.
Black: 441
Gold: 418
Blue: 391
White: 368
Green: 313

Hole 14
PAR 4 | YARDS: 471 | HANDICAP: 14
The 14th hole is a strong par 4 that can stretch to nearly 470 yards. The elevated teeing ground looks down on a wide landing area between two flanking fairway bunkers. Once the drive finds the fairway, players face a long approach toward a centerline bunker fronting the green. Low, running shots to the left side can feed down the slope to a large, undulating putting surface. A miss to the right will find a small bunker or a collection area that will challenge your short game skills.
Black: 471
Gold: 433
Blue: 403
White: 384
Green: 331
Hole 15
PAR 5 | YARDS: 596 | HANDICAP: 2
At nearly 600 yards from the tips, this big par 5 is a serious test. It is long, plays uphill, and usually plays back into a prevailing wind. The fairway has ample width for the first two shots, but narrows into an upper and lower landing area as players approach a long, narrow green. Be sure to lay up at a comfortable distance for your third. Dramatic bunkering protects the front right side of this gently-contoured surface. Hole 15 gives a lot of ground to cover, but three great swings and this par 5 offers a roll at birdie!
Black: 596
Gold: 570
Blue: 545
White: 529
Green: 434
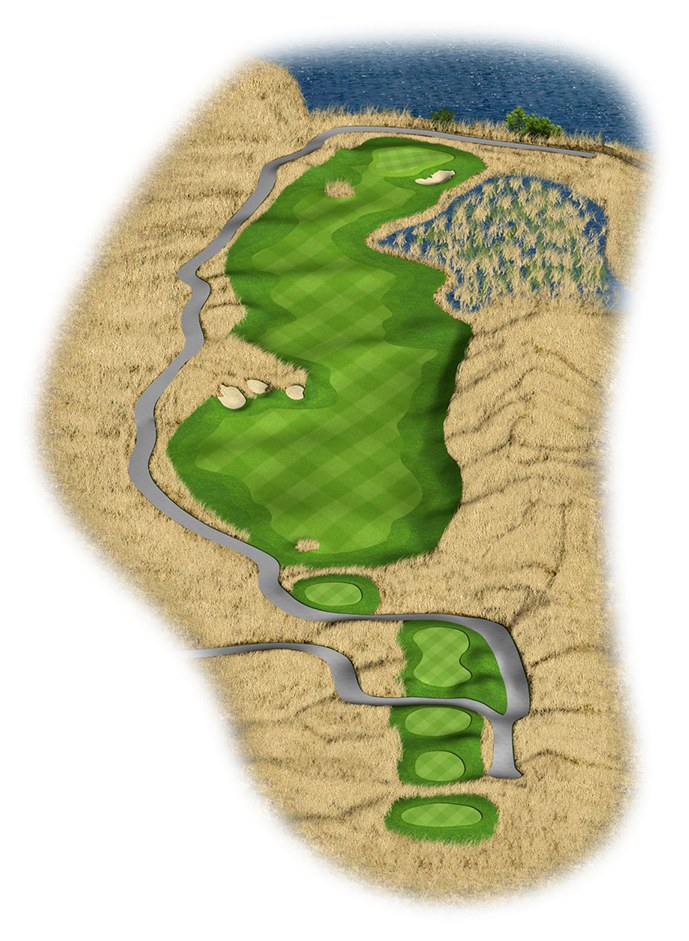
Hole 16
PAR 4 | YARDS: 487 | HANDICAP: 8
Extra speed on the tee will be helpful at hole 16. This is a strong par 4, but the hole can be shortened with a big drive over the dune on the left side. A downslope behind the dune will kick tee shots forward and shorten the approach. Misses to the right side face serious consequences. The second half of this hole is protected with a vast water hazard to the right. Second shots need to clear a fronting bunker to find this green, and stunning view of the East River.
Black: 487
Gold: 432
Blue: 437
White: 406
Green: 406
Hole 17
PAR 3 | YARDS: 193 | HANDICAP: 16
This gorgeous par 3 sits at the base of one of the largest dunes on the property. The elevated green is protected by deep, punishing bunkers to the left and right. Misses from the tee lead to very difficult recovery shots, but a good swing with the right club offers an opportunity here. If your shot stays on the proper section of this multi-tiered green, there is a good chance for a circle on the scorecard.
Black: 193
Gold: 165
Blue: 142
White: 123
Green: 107

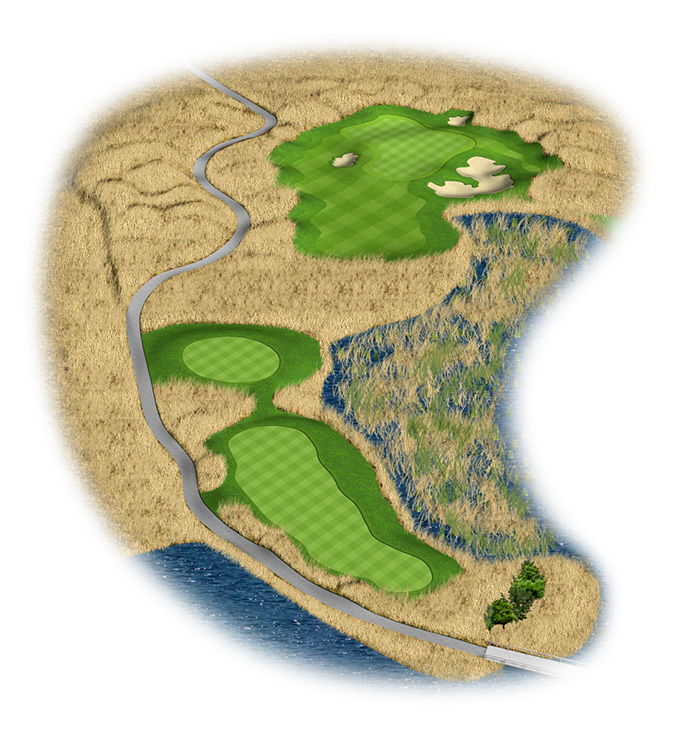
Hole 18
PAR 5 | YARDS: 576 | HANDICAP: 12
At 581 yards, the 18th is a three shot hole from the tips. Longer drives can clear the center bunker, but shorter hitters may need to stay to the left or right side of the fairway. This par 5 is a double dogleg, so positioning the second shot is critical. Dunes and fescue line the right side while a miss to the left will find a lateral water hazard. The approach is framed by the Whitestone Bridge and demands both accuracy and distance control. Avoid the greenside bunkers and you'll have a chance to cap off your round with a birdie!
Black: 576
Gold: 527
Blue: 499
White: 481
Green: 425
Awards & Accolades
Golfweek
2015 - 2020 • Best State-by-State Courses You Can Play (#2 in New York)
2019 - 2020 • Top 100 Courses You Can Play in the United States
2024 • Top 3 Best Public-Access Golf Courses in New York

Golf Digest
2015 • Best New Courses (#2)
2016 • Best Golf Schools & Academies
2017 • America's 100 Greatest Public Courses
2017 • The Best 18: NYC (Hole #18)
2019 • 50 Best Teachers in America (Michael Breed)
Best Teachers in Your State | New York (Michael Breed, #1)

GOLF.com
2015 • Best New U.S. Course You Can Play
2015 • Golf Magazine - Top 10 Municipal Courses in the U.S
2015 • Golf Magazine - Best Trips
2015 - 2019 • Top 100 Teachers in America (Michael Breed)
2016 • The Dream 18 - Best Holes of Public Golf Courses (Hole #16)
2016 • New York Golf Courses: Best Public Golf Courses
2017 • Top 100 Courses You Can Play

MGA

American Academy of Hospitality Sciences
2015 - 2017 • Five Star Diamond Award
2018 - 2019 • Six Star Diamond Award

Golf Inc
Best of 2017 • Top 25 golf courses in New York according to reviews
2019 • Golfers' Choice: Best of New York Golf Courses

NY POST
2020 • Best 18 Golf Holes in the NY Metro Area (Hole #18)

Northeast Golf Magazine
2018 • Best in New York Golf | Public Courses
